

Table of Contents
Headlight restoration starts with a simple truth: cloudy lenses steal light, shorten visibility, and make a good car look tired. This guide explains why plastic covers turn yellow, which repair paths actually last, and how to polish them safely at home. You will learn what tools matter, which mistakes to avoid, and when replacement is the smarter call.
Fuel prices have gotten high in recent years, so drivers care more about saving money on every trip. Big SUVs from the past taught many owners that poor mileage drains a budget fast. The lesson carries over here: clear lenses improve night safety without buying new assemblies, and basic upkeep beats costly repairs. Think of this project as practical car care that protects both your wallet and your visibility.
Why Car Headlights Turn Cloudy and Yellow
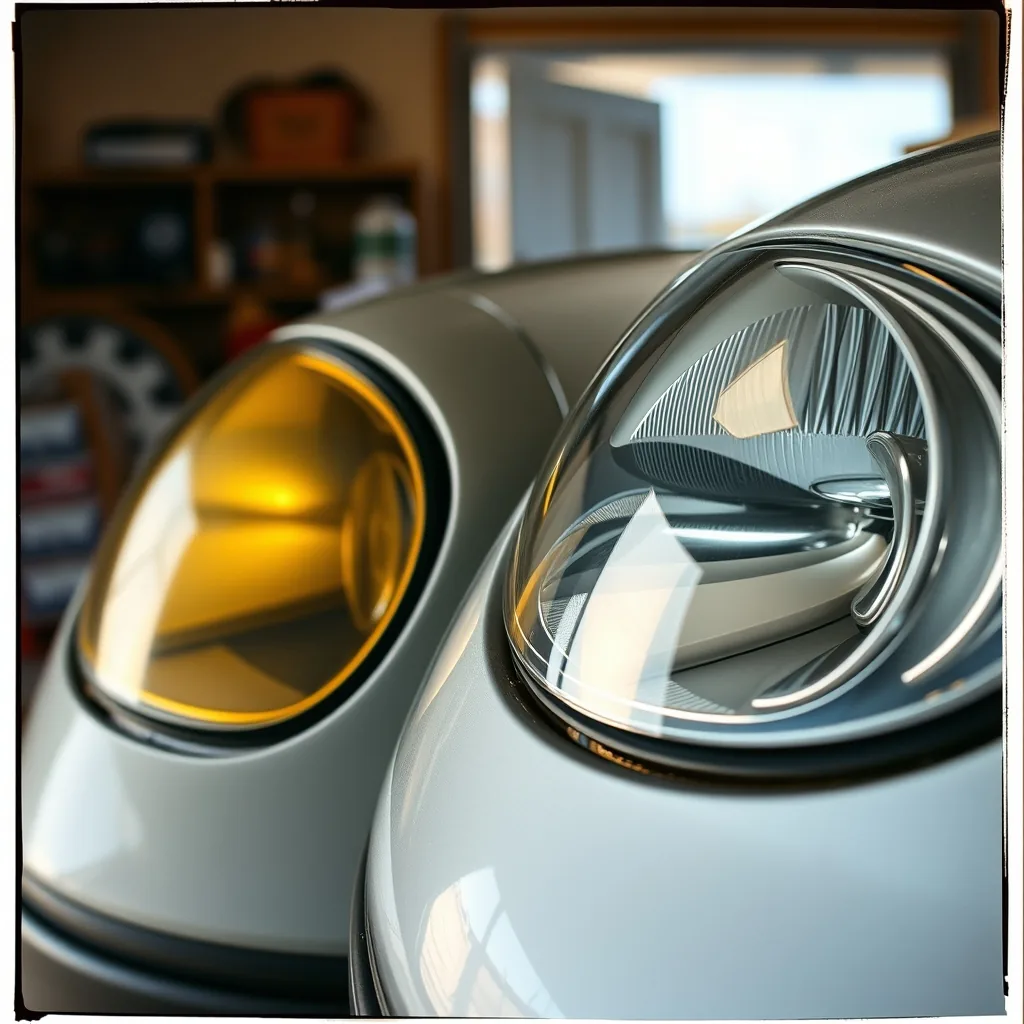
Most modern lenses are polycarbonate plastic with a factory UV coating. Sun, heat, road grime, and car-wash chemicals wear that coating down year after year. Once the layer fails, the bare plastic oxidizes and turns hazy, yellow, or rough to the touch. Headlight restoration becomes necessary at that point because surface washing alone cannot remove embedded oxidation.
Road damage speeds the process. Small stones chip the coating, winter salt dries on the surface, and parking outside exposes lamps to constant ultraviolet light. Moisture can also fog the inside when seals weaken, which looks similar but needs a different fix. A careful headlight restoration plan first checks whether the haze sits outside, inside, or both.
Do a quick test in daylight. Wash and dry the lamp, then look at it from several angles. If the outside feels rough and looks milky while the inside looks dry, surface oxidation is the likely cause. If you see droplets or a foggy film that moves with temperature, suspect a seal leak instead. Knowing the difference saves time and prevents sanding a lamp that actually needs drying and resealing.
Headlight Restoration Methods Compared
Drivers generally choose among three paths: a wipe-on kit, full wet sanding with polish, or professional refinishing at a shop. Wipe-on wipes and sprays are quick and cheap, but they often fade within months because they skip real surface correction. Headlight restoration with sanding takes longer yet removes the damaged layer and lasts far longer with proper sealing.
A boxed kit suits light haze on a daily driver if you follow the steps fully. It usually includes cleaner, fine abrasive pads, polish, and a sealant wipe. For broader upkeep habits beyond lamps, this DIY car maintenance checklist helps you schedule washes, inspections, and small fixes before they grow. Whichever kit you pick, avoid shortcuts and give each chemical its full dwell time.
| Method | Best for | Typical cost | How long it lasts |
|---|---|---|---|
| Wipe-on polish kit | Light haze, quick sale prep | Low | Two to six months |
| Wet sanding plus polish and sealant | Moderate to heavy yellowing | Low to medium | One to three years with sealing |
| Shop refinishing with clear coat | Severe damage or fleet cars | Medium to high | Several years when maintained |
Professional shops sand deeper, machine polish, and spray a durable clear coat that resists sun far better than wipe sealants. The price is higher, but the finish often looks closest to new and holds up through winters. Choose a shop that masks paint carefully, shows before-and-after photos, and explains the warranty in writing.
Headlight Restoration: DIY Steps That Work
A careful headlight restoration at home follows the same logic pros use: clean, sand evenly, refine, polish, then seal against the sun. Work in shade on a cool lamp, gather painter tape, microfiber towels, a spray bottle with soapy water, sandpaper in several fine grades, plastic polish, and a UV sealant. Patience matters more than force, since steady passes beat hard pressure.
Start by washing the lamp and masking the surrounding paint with two layers of tape. Wet sand with light, even strokes, keeping the surface lubricated and checking progress often. Move from a coarser to a finer grade only when the previous scratches look uniform, then headlight restoration continues with polish on a foam pad until the plastic turns clear again.
Wipe the lamp clean, remove any polish residue with isopropyl alcohol, and apply the UV sealant in thin, overlapping coats. Let it cure fully before washing or driving in rain, and keep the car parked under cover for the first day when possible. For year-round scheduling of washes, filters, and inspections, follow this routine car maintenance guide so clean lamps stay part of a larger habit.
Avoid common mistakes that ruin an otherwise good job. Never sand dry, never skip grades, and never polish in direct sun where compounds dry too fast. Do not use household abrasives, steel wool, or aggressive solvents that melt plastic. If the lens stays gray after patient sanding, stop and reassess rather than grinding deeper and thinning the cover.
Finish by aiming and testing the lights at night on a flat wall. Park twenty feet back, mark the cutoff lines, and confirm both beams sit even and bright. Clean the lamps monthly with mild soap, reapply a spray sealant every few months, and wax only the paint around them. These small headlight restoration habits keep the result sharp far longer than any single miracle product.
When to Replace Instead of Restore
Sometimes headlight restoration is not enough. Deep cracks, broken mounting tabs, melted sockets, or heavy internal moisture often mean the assembly has failed structurally. If sanding reveals crazing deep inside the plastic or the reflector looks flaked and dull, polishing the outside will not bring back real brightness.
Compare costs honestly before deciding. A premium kit plus sealant and several hours of labor makes sense on an otherwise sound car, but not on a lamp with water inside every morning. Check prices for new or quality used assemblies, factor in aiming and sealing work, and consider how long you plan to keep the vehicle. For background on materials and care standards from a major manufacturer, see this 3M car care resource alongside your owner manual.
If you replace, buy the correct side and bulb type, transfer any reusable bulbs and clips, and seat the new gasket evenly to block moisture. Torque fasteners gently, reconnect wiring without forcing plugs, and aim the beams before night driving. Keep the old assembly until the new one is tested, since clips and seals can serve as spares.
Verdict: Keep Lenses Clear and Save Money
Clear lamps are a safety upgrade you can see on the first night drive. A patient headlight restoration removes years of haze, sharpens the beam cutoff, and helps oncoming drivers judge your position sooner. The job costs little, takes an afternoon, and pairs well with wipers, tire checks, and bulb inspections.
For most drivers, wet sanding with polish and a true UV sealant is the sweet spot between effort and durability. Headlight restoration done this way typically holds clarity for a year or more with basic washing and periodic sealing. Wipe-only products suit only the lightest fog or a quick cosmetic refresh before selling.
Start this weekend with a wash, a daylight inspection, and honest notes on each lamp. If the haze is outside and shallow, gather supplies and work through the steps above without rushing. If the damage runs deep or water sits inside, price a replacement and move on. Either way, you will drive safer and spend smarter.
How long do polished lenses usually stay clear?
Most hand-polished lamps stay clear for one to three years when sealed and washed gently. Sun exposure, outdoor parking, and harsh chemicals shorten that span. Reapply a spray sealant every few months and wash with mild soap to extend the result.
Can I drive safely right after polishing the covers?
Yes, once the sealant has cured per label directions. Many products need a few hours out of rain and sun. Test the beams at night on a flat wall and confirm an even pattern before a long trip.
What upkeep keeps clear covers from turning yellow again?
Wash monthly with mild soap, avoid abrasive brushes, and park in shade when possible. Add a light sealant coat each season and fix small chips early. Steady care matters more than any single premium product.
Dinda Margareta is a senior automotive editor at Auto Store covering collision repair, EV tech, and classic restoration. 5+ years, 130+ guides. Method: OEM position statements and repair data cross-reference. Author of 2,333 auto guides since 2022.

More Stories
Collision Auto Center: Expert Guide to Quality Repair
Auto Detailing: Ultimate 7-Step Expert Guide
Auto Detail Jobs: 7 Facts You Must Know First